Jawbone UP 24 Fitness Tracker - Review by Benjamin Traves

jawboneup24image1

The Jawbone UP24 is an interesting fitness tracker which lacks many typical features of wearables, such as a screen or display of any kind, yet somehow remains extremely useful and functional even without such features.

jawboneup24reviewimage2

Instead of relying on a screen, notifications are delivered to the user via vibration. This is a concept similar to that of a cellular phone set to "vibrate" instead of ring. The vibrations can mean several different things depending on the programming you choose, but these alerts can initially be a strange sensation for the wearer.

The two best features of this fitness band, at least in my opinion, are the sleep tracking and the food logging. I plan to buy an Apple Watch when it comes out (along with a few million other people) and that will have various fitness tracking capabilities which will undoubtedly integrate seamlessly with my iPhone 6 Plus. So, why did I buy the Jawbone UP24? Because I think it offers a feature set which will not be made redundant the upcoming Apple Watch, perhaps most important of these being sleep tracking, which the watch may not do since it must be recharged nightly (assuming you wore it all day). Battery life is one area where the UP24 excels. It is not an exaggeration in my recent use of the UP24 to say that the battery lasts over a week, easily, and at one point the app indicated approximately 10 days of battery life were expected. Update: Just recharged it again, and it estimated 14 days remaining. I would still say 10 at the very least, based on my experience over the course of more than a month (wearing it all day and at night, seven days a week).

The Jawbone app is essential to the function of the UP24, especially since there is no screen on the device. That being said, I'd much rather look at a huge, nice iPhone display than an 8-bit readout that looks like it's from a vintage digital watch. The main screen you will see (left) indicates your sleep (purple) and steps (orange) by percentage of your "daily goal" and also a total count. Below those two indicators, you will see tips on how to improve your lifestyle / health and eating habits. Most of them are actually quite useful and interesting. Behind the main screen is the one seen here on the right, which indicates the various custom settings and parameters you choose for the fitness band to alert or remind you of various things. Alarms, inactivity warning or "Idle Alert," even reminders to eat can be set here. Overall a fairly useful pair of screens to control the Jawbone UP24.

Almost everything was good about my experience with this fitness tracker. What bothers me about it? Annoying alarm functions: If I am asleep, why does it wake me up and then tell me to go to sleep? Not really in the category of "cons," it's really more of just a "quirk" or minor complaint. But a couple of times, when I went to bed earlier than the preset time I selected in the app, the UP24 would vibrate (when I was already asleep, and had put it in sleep mode) to remind me that it was "time for bed." Thanks wristband, but I already told you I was going to sleep by pressing the button for sleep mode.

Overall, this is a great fitness tracker and I will keep it even with the Apple Watch coming out soon. I really like the corresponding app for the Jawbone UP24 and I think it makes a more complete package that way, even without a display on the actual band.

Thanks for reading this review, and I hope it helped you decide one way or the other regarding the Jawbone UP24 fitness band. If you have questions, feel free to leave a comment in the section below. I will have more reviews coming soon, so feel free to subscribe via email on the right side of this page (I will not email more than once every two weeks with updates) and be sure to check back soon for more!


Below is a link to the one I bought on Amazon, and I do get a very small percentage if you buy your UP24 or anything else on Amazon via this link (which I greatly appreciate, and all the money will go toward Amazon credit to buy more equipment for review in the future)

The links are for the Medium size, in red (which I have) and black or "Onyx" as they call it. If you have a relatively small or large wrist size, I would suggest searching for the other options, but measure your wrist and check each product description just to be sure of a good fit.


Fujifilm X100T Hands-On Preview Video by Benjamin Traves

Here's a quick hands-on video of the Fuji X100T:

Be sure to follow me on Vimeo and YouTube

My full review of the Fujifilm X100T is coming soon! If you already know you'd like to buy the camera right now, here's the link:


Review of the new LEICA D-LUX (typ 109) by Benjamin Traves

I just had the opportunity to test out the new Leica D-LUX (typ 109) and here are some of my thoughts on it, along with sample images below. This is not an in-depth review, just a quick preview and a few images.


Note: Every photo on this page was taken by me, please do not use these or post them elsewhere without my written permission. All images ©2014, Benjamin Traves


LEICA D-LUX (typ 109)

So, the long wait for a new D-LUX camera is finally over. Leica managed to sandwich a Micro 4/3 sensor into a camera scarcely larger than the previous version. I am told the new sensor is five times larger. Luckily, it doesn't cost five times more for the camera, although it has increased from around $800 for a D-Lux 6 to just under $1,200 for this new version. Considering the new sensor and many other major improvements, especially a built-in electronic viewfinder (EVF), it is a rather modest increase in price. The manufacturer warranty has also been increased to 3 years, and as with all Leica cameras, this one includes Adobe Lightroom 5 software. That being said, I used Lightroom 5 to adjust all RAW images to my own preferences.

If you currently own a D-Lux 6 and are wondering if there is enough difference to justify the upgrade, I can honestly tell you it is a completely different camera except for the name and a familiar silhouette. This is not just a sensor upgrade (although that by itself would be enough of a reason to swap, in my opinion). The lens is new as well, as it had to be designed to accommodate the much larger sensor in this version. This is only a quick preview of the camera so I won't go into depth on the optical design, but in actual use it works great. You can click any of these sample images to enlarge them and see what you think.

Settings: f/5.6 and 1/160th, ISO 400

The new electronic viewfinder (EVF) is a big help here in Florida, where the merciless sun beats down on photographers struggling to use their LCD screens to compose an image. The fact that it is by far one of the best EVFs currently built into any compact camera is nice too, but the main point is that this has one, it's easy to use, and it's a great help in certain situations. It's automatic, just hold the camera up to your eye and it will turn on as the rear LCD turns off.

The metal body feels quite nice, cool to the touch and very solid. A big upgrade from the rather plastic body of the D-Lux 6. A small bit of rubber where your right thumb would be is perfect for keeping a good grip on the camera. As you can see, there are several neat buttons on the back. Most are self-explanatory (like "WiFi" or "ISO" or the universal red dot which means "record" for video, and the triangular playback symbol) but others like "QM" (Quick Menu) and "WB" (White Balance) are less obvious. Still, it's very easy to pick up this camera and go take great photos.

Inside the Perez Art Museum in Miami. Settings: f/3.2 and 1/125th, ISO 200

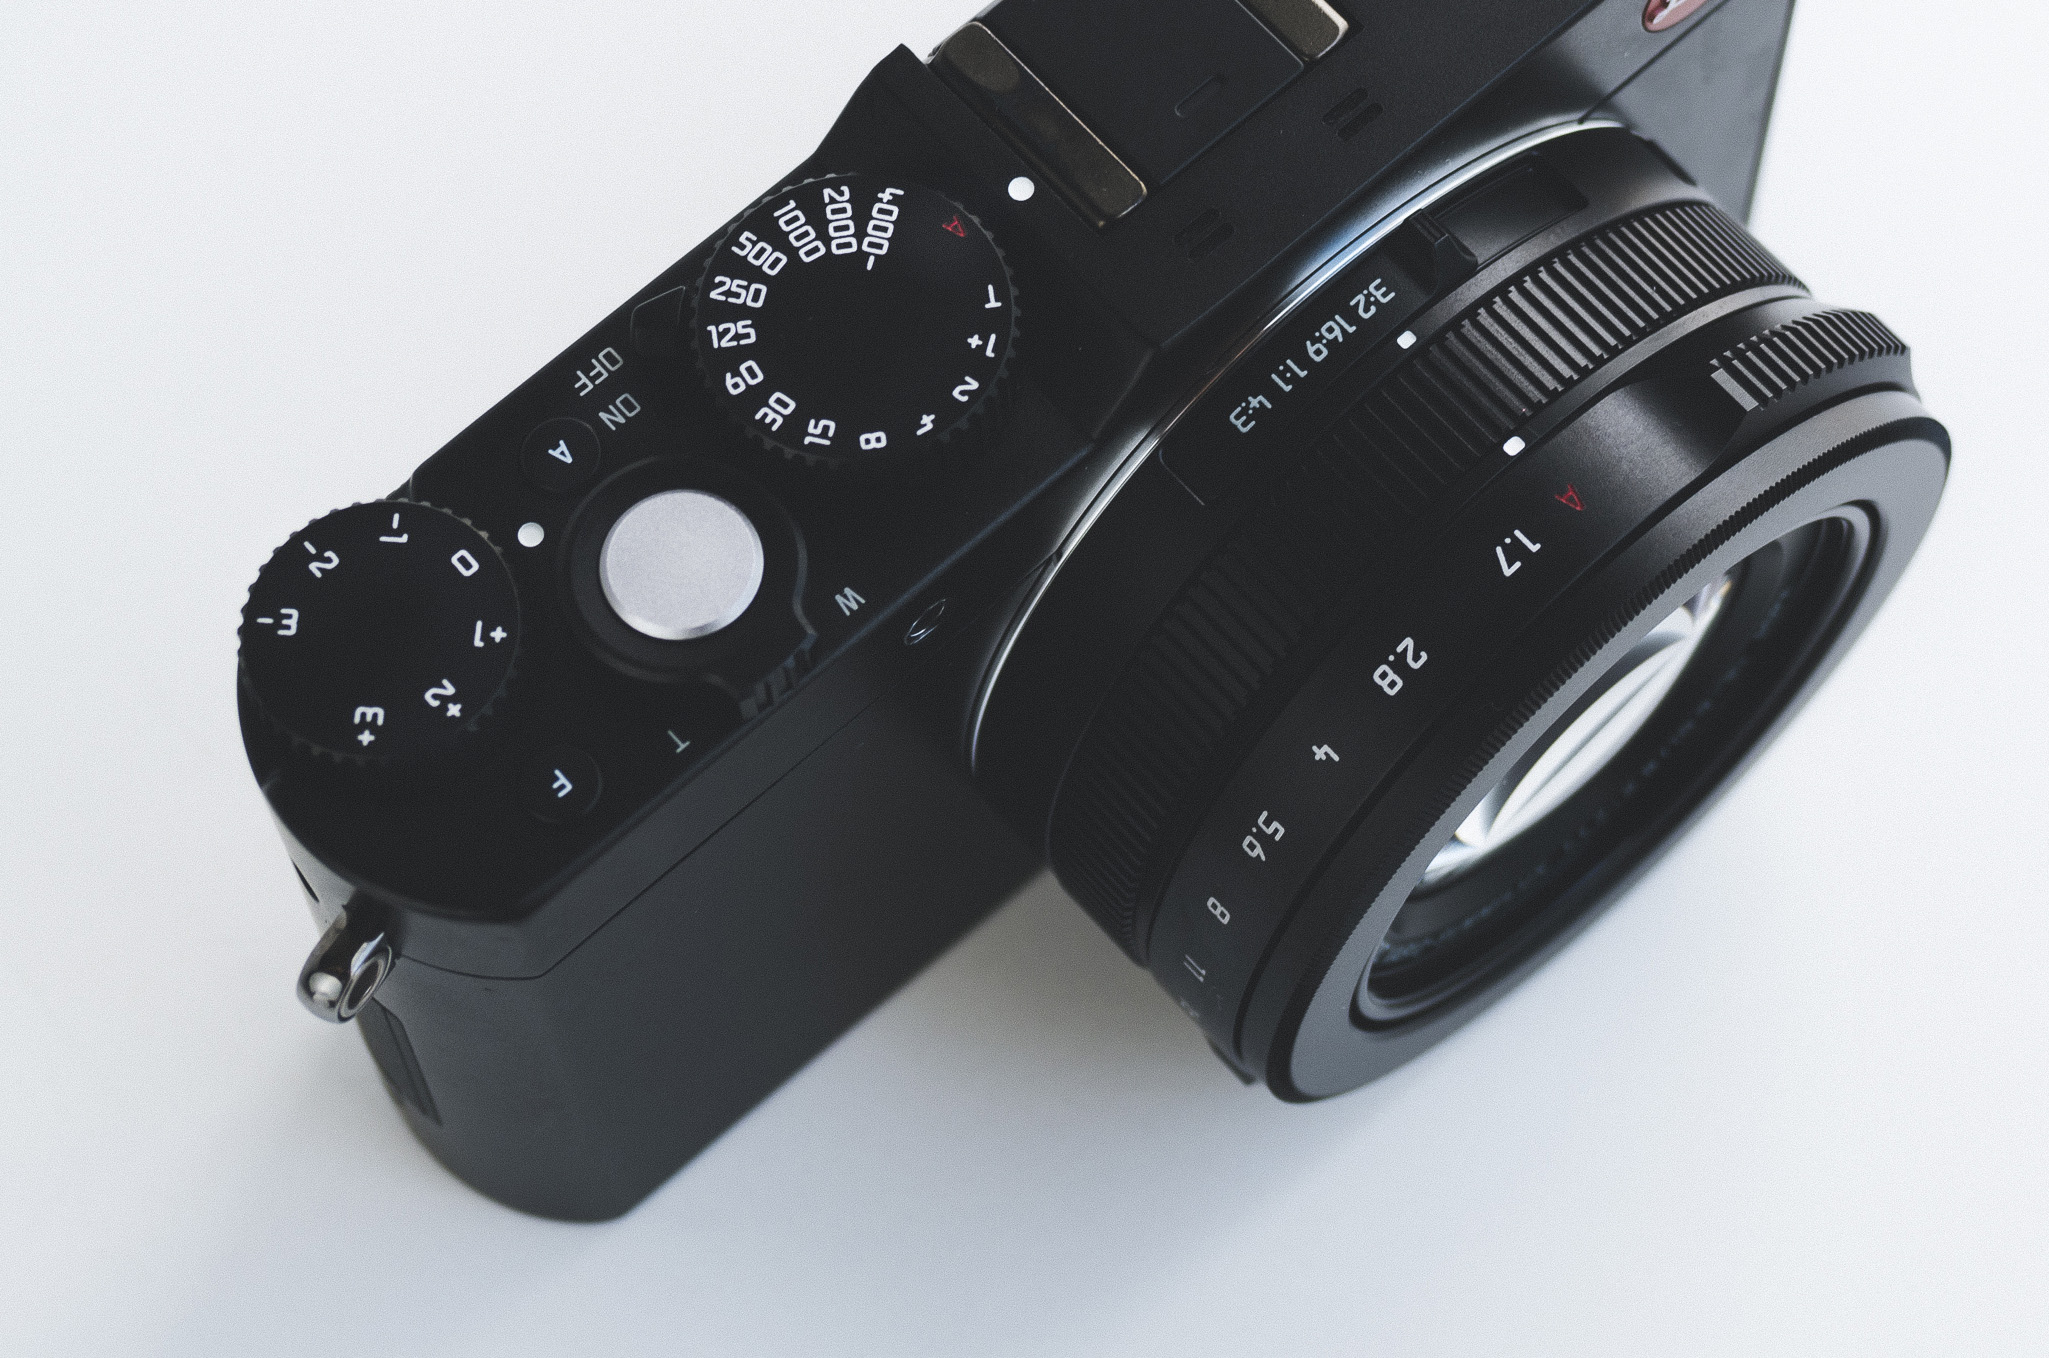
The handling and controls are great, very intuitive as it is set up just like the flagship Leica M series, with an aperture ring on the lens and shutter speed dial on top. Unlike the M, this one has autofocus and the option to let the camera select the aperture in addition to selecting the ISO and shutter speed. It is great to have physical controls when you need them and also automatic modes for just walking around.

L1040118.jpg

Operation is incredibly simple: if both controls are set to "A" then the camera is in Program mode. Shift either of the dials and you will be in Aperture priority or Shutter priority mode. Shift both, and you are in Manual mode. Essentially this gives you instant manual override of either critical function, Aperture or Shutter Speed, or both. Perfect, it just works.

In addition to the Shutter Speed dial on top, there is an Exposure Compensation dial for quick adjustments of +/- 3 EV in thirds of a stop. Very convenient and easy to reach with your right thumb. You can use that to control exposure (brightness) without having to change your other settings. Overall, I'm quite pleasantly surprised by the features and functions of this camera, as well as the image quality.

Settings: f/4 and 1/125th, ISO200

What strikes me as I review these sample images is that they really are substantially better than I expected. I probably should have mentioned at the beginning of this review that I am not a fan of most compact cameras. Every camera I have owned in recent history has been full frame, and I rarely take other cameras seriously. The results from this camera actually made me sit forward in my chair while I was editing images.

When I talk to people about what camera to get, I tell them what matters most is that they enjoy using the camera and of course that they love how the images turn out. If you like what you see, then clearly the new lens and the new sensor have made a difference. If you have any questions, feel free to ask in the comments below and I'll do my best to answer.

Sample Images:

Perez Art Museum, Miami. Settings: f/5.6 and 1/200th, ISO 200

Settings: f/5.6 and 1/160th, ISO 400

Settings: f/5.0 and 1/125th, ISO200

Inside the Perez Art Museum, Miami. Settings: f/2.5 and 1/125th, ISO200

Settings: f/5.0 and 1/125th, ISO 200

Settings: f/5.6 and 1/160th, ISO200

Perez Art Museum, Miami. Settings: f/5.6 and 1/320th, ISO200

Settings: f/5.6 and 1/250th, ISO200

An elevator at the Perez Art Museum in Miami. Settings: f/5.6 and 1/1250th, ISO 200

Thanks for reading and be sure to check back soon for more reviews!


Aerial by Benjamin Traves

I've always enjoyed looking out the window on airplanes. I've missed good shots by having my camera in my bag so this time I left it out almost the entire flight over the deserts and mountains of the Southwest. I did a mini series of my favorite images from the set, just for fun and as something different in my personal work. These were all taken with the Sony RX1-R

This button links to the gallery on my site: